As online shopping continues to rolling in popularity, businesses are increasingly turning to online advertising platforms to reach their target audience.
Among these platforms, Google Shopping stands out with around 76.4% of retail searches in the entire e-commerce landscape.
And that’s the reason why every e-commerce owner wants to rule on this platform and take their online businesses to the next level.
But, did you know, around 7% of all products submitted to Google Shopping are disapproved due to improper product listings?
Apparently, it may seem low, but this 7% can lead to a significant number of missed sales and frustrated customers.
Even if somehow you manage to add your products to shopping ads with such poor listings, there is no chance you’ll rank on top.
So, eventually, you’ll end up spending time and money on your ads, but get zero clicks.
In this guide, I’ll explore the step-by-step process of effectively integrating your WooCommerce products with Google Shopping to place higher. You’ll get to know not only the free listing, but also paid to ensure your products stand out in the competitive marketplace.
So, Let’s dive in!
How Does Google Shopping product listing work?
We all know that, Google Shopping is a comparison shopping platform integrated with Google Search. It provides users with a convenient way to browse through products, view prices from different sellers, and make purchases directly through the platform.
Let’s get a clear understanding with the image below. Here, I’ve searched for running shoes in the Google Shopping tab, and it gives me all the available options with images, prices, ratings, and other details.
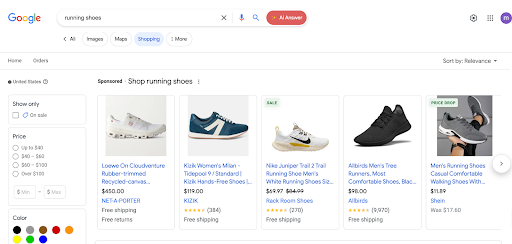
Now, if you take a closer look, you can see there are different stores positioned at different places for “running shoes” in the search result page.
Do you think, it’s just a random positioning of products?
Well, it’s a big NO!
Like general Google searches, Google shopping also prioritizes the user’s search intent and search engine optimization.
So, when someone searches for a product on Google Shopping, it shows the most relevant and optimized product listings at the top of the search results page.
Now tell me, when you search for any product on Google, which store do you visit first?
I bet it’s within the top 5 stores. Right?
In fact, studies also show that the top 3 search results receive more than two-thirds (68.7%) of all clicks on the Google Search page.
And, that’s where Google Shopping product listings come into play.
If you don’t properly list your products on Google Shopping, there is no chance to rank and get any clicks, no matter how good your products are.
On the other hand, the more relevant your product listing is, the more chances you have to rank at the top of the Google Shopping tab.
And you won’t believe that, improving your shopping listings can boost around 36% of how often your products appear on Google.
Huge, right?
Now, as a Woocommerce store owner, you better know how important it is to list products for Google Shopping in the most optimized way.
But, do you really know how to exactly list your Woocommerce products for Google Shopping to rank higher?
No, worries. Let’s jump into the step-by step guidelines for listing up Google shopping products in the best way possible, along with some bonus tips and cautions.
List Your WooCommerce Products on Google Shopping (Free and Paid)
Before going to the steps, let’s discuss the methods you can use for listing your Woocommerce products on Google Shopping.
Basically, Google Shopping offer two types of product listings:
- Free Product Listing (Organic)
- Paid Product Listing (Paid Ads)
Free Product Listing: In simple words, free product listings appear naturally in search results when they match what people are searching for. This is an organic listing that ranks only for search engine optimization and user intent, where you have to spend nothing on advertising.
Paid Product Listings: On the other hand, paid product listings involve advertisers paying for high placement in the shopping ad section of Google search results. Advertisers bid on keywords, and their products are displayed prominently when users search for those terms.
Note:
Now, if you’ve paid listing, surely Google’ll show your products at the top row, but with a small indicator “Sponsored” to tell the users that these are paid listings.
Let’s see how Google Shopping shows free and paid listings of your products.
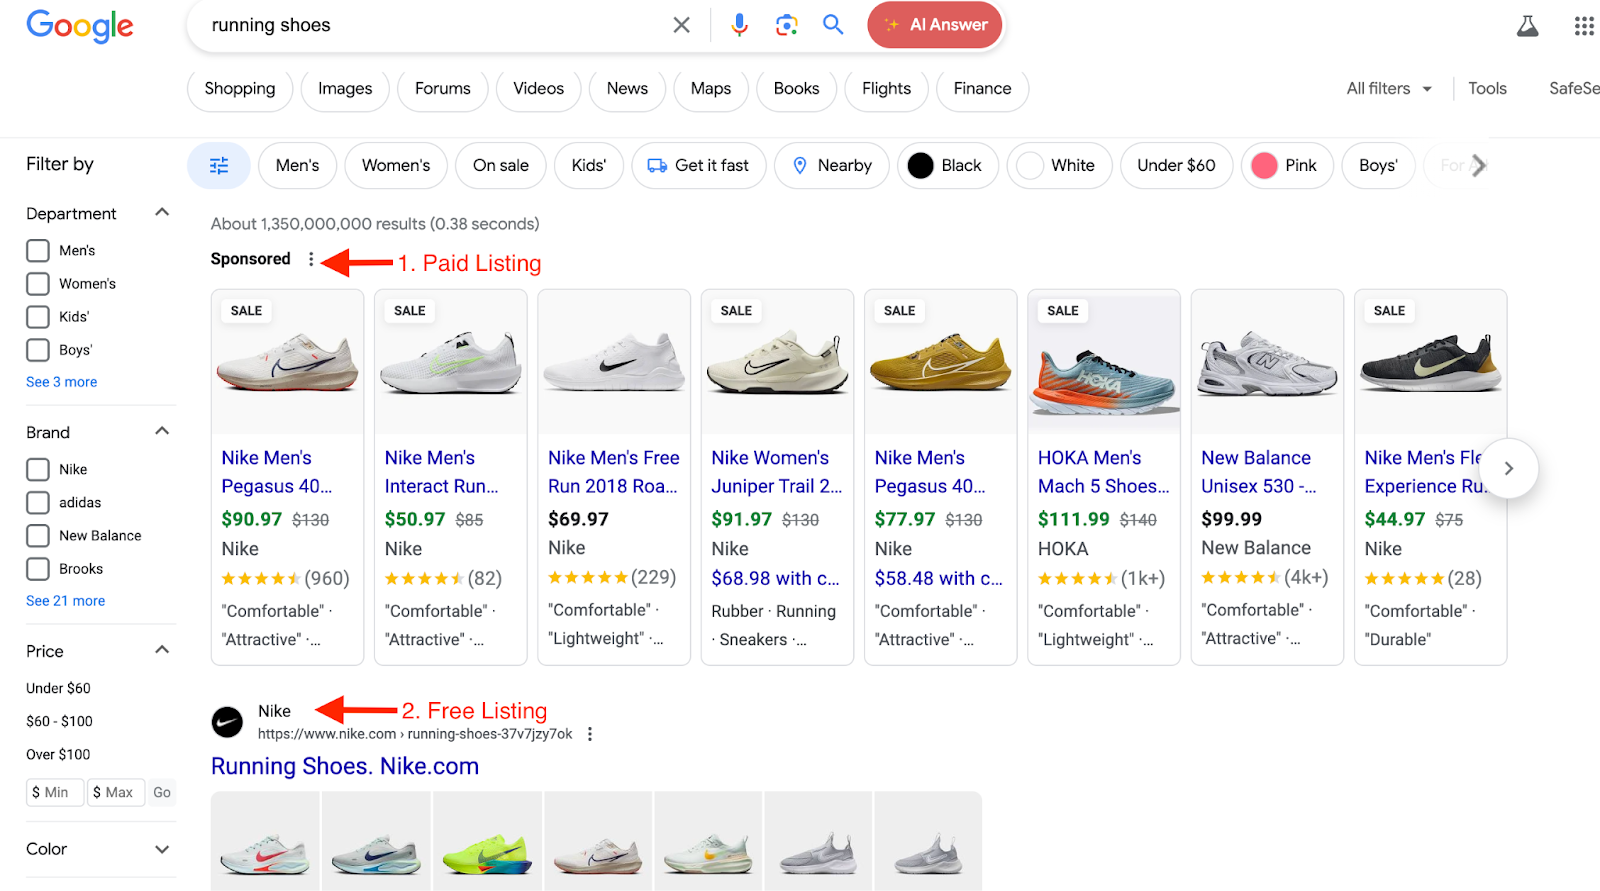
You get it, right?
Yes, all the products under the Sponsorder tag are paid listings. Again, if you look at Nike which is ranking on the 2nd, it’s the free listing rank only for the brand value, and obviously for optimized product listing.
Both free and paid Google shopping product listings are worth for your business to increase visibility and drive traffic to your online stores.
Now, let’s jump into the product listing steps.
1. Set up Google Shopping feed for WooCommerce
Every merchant needs a product feed tailored to their specific advertising goals and platform. Google Shopping is no exception.
While WooCommerce stores have a lot of flexibility in how they present their products, Google Shopping requires a specific format for its product feed.
This format ensures that Google can understand your products and display them accurately in search results.
But, where you can find this Google Shopping product feed format?
Well, you can find the official Google Shopping product feed format specifications in the Google Merchant Center Help Center.
There, you’ll find detailed information about the required and optional attributes for your product data, along with specific formatting guidelines.
Once you know what product specifications you need on Google Shopping, let’s start setting up your products.
But, wait, first find out the ways you can set up your products on Google Shopping:
- Manually
- Using Plugin
You can choose any of the methods. But somehow, are you thinking of manually doing so?
Well, I’d never recommend this. It’s because, manually setting up products for shopping isn’t too much time consuming and error-prone as well.
Again, if you manually start adding product attributes in this very first step, it’s going to be a total hassle and further delay your next steps too.
So, what’s the solution?
Yes, it’s always with the plugins. But, you mau ask, which plugin?
It can be confusing, as there are certain plugins that can do this job for you.
However, most WooCommerce owners, and even I personally use WooCommerce Google Shopping Product Feed Plugin, “CTX Feed” to
automatically set up all the necessary fields for Google Shopping in seconds.
In fact, you don’t have to worry about any missing required data and get rejections from shopping.
Again, you can add custom fields to provide any extra or special features for your products.
And the best part?
This freemium plugin allows you to set up your Woocommerce product feed for more than 130+ channels. Along with Google Shopping, it ensures optimized product feed for Facebook, Instagram, and other highly demanding advertising platforms .
Now, come to the main part, and let’s jump into the steps to add your products on Google Shopping with the CTX feed plugin.
Free Setting up Google Shopping feed with CTX-Feed:
First, install and activate the CTX Feed plugin. Simply go to your site’s dashboard and go to Plugins> Add New Plugin.
Then, in the search bar, type ctx feed and press Enter. You’ll find it at the very first entry like the image.
Now, hit on Install and then activate to add the plugin in your site.
If you’ve installed the plugin successfully, you’ll find it in the left panel of your site.
Simply click on CTX Feed>Make Feed. You’ll find the exactly same interface like below.
Well, now it’s time to adjust the settings.
You can see that here are some fields like country, template, file name, etc. Just select your country where you’ve your Woocommerce store.
Here come’s the magic part, Template. Just click on the drop-down menu, and you’ll find 130+ advertising channels for generating product feeds.
As we’re listing products for Google Shopping, so simply click on Google Shopping from the list.
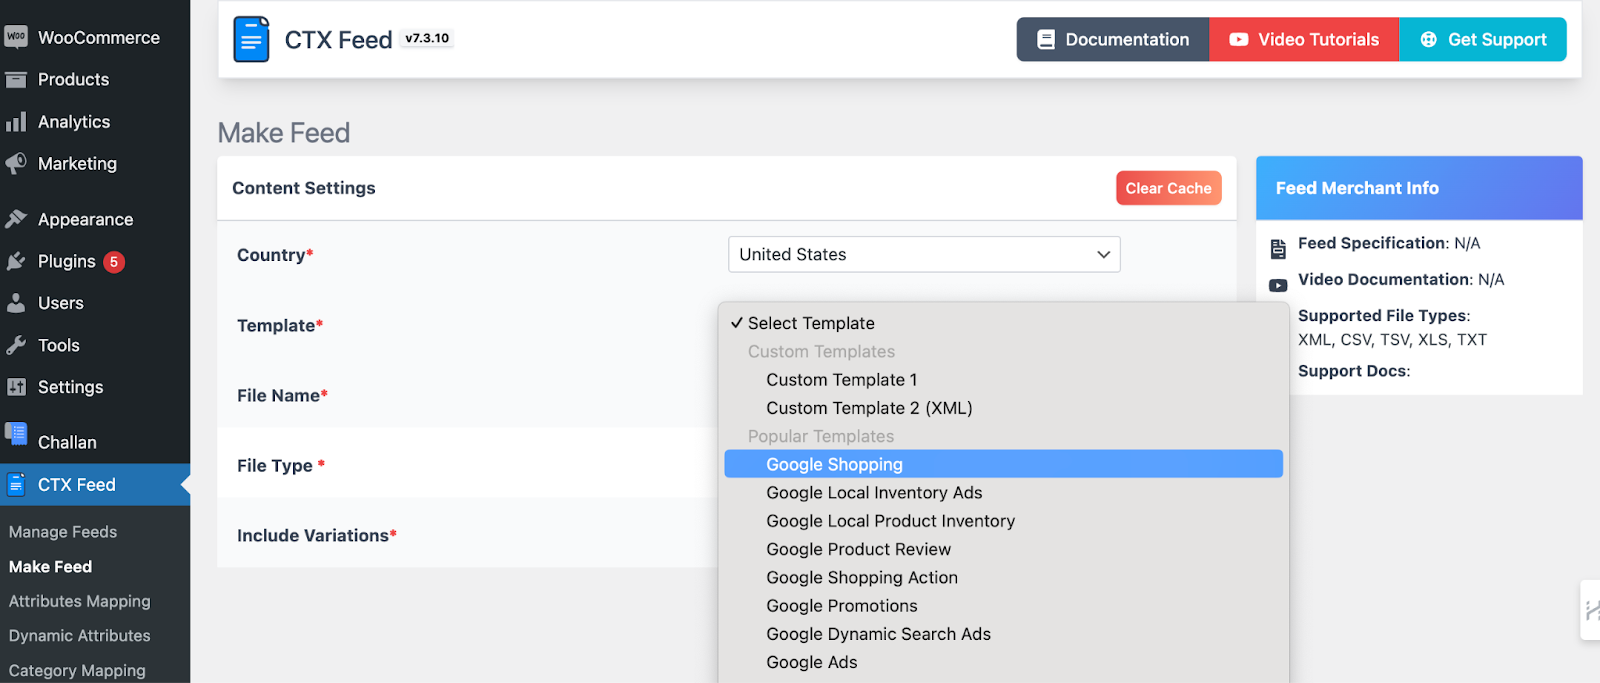
For the File name, you can set any name you prefer. Here, I set the File name as MyGoogleFeed.
And, when you set File type, you’ll have options like
- XML,
- CSV,
- XLS,
- TXT,
- XLSL,
- TSV,
- JSON.
I generally use CSV or XML, but it’s totally up to you what format you need.
Now, just wait a moment and think about the products in your store?
Are all of them in the same variant? I mean, if you’re selling T-shirts, then do all your products come in same size, same color, or even the same design?
It’s definitely not, right?
And here, comes the excellent feature, Include Variants. In this field, you can select your product variants based on different types.
Just think about what type of customers you’re targeting. For example, if you’re targeting customers with tight budget, then choose Cheapest Variation from the list to show your low priced products first at the listing.
It’ll grab the attention for all the cost conscious customers and you’ll eventually get the attention of a specific but broader group of people.
But, hey, if you’ re still confused about your target audience, just keep it as default “All Variations”.
Again, you can separate each variations with a delimiter and an enxlouser as well.
Well, your half job is done. Just scroll down and see the magic. A optimized Google Shopping product feed is generated for you.
Simply provide the attributes according to your products, and once done, hit on the Update And Generate Feed button.
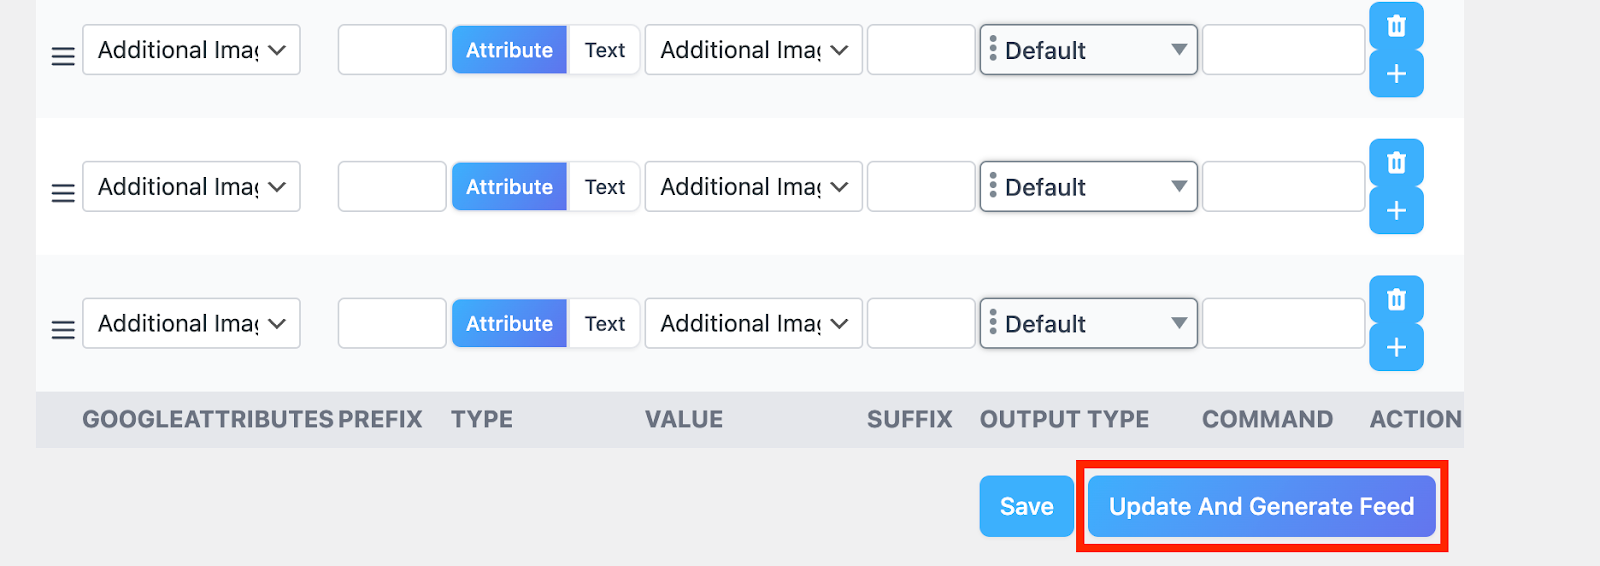
Now, what if you want to include some additional attributes in your Shopping feed?
With CTX Feed, it’s a matter of a click. To include a new attribute, just click on the + icon and a new section will add up immediately.
Again, to remove any, hit on the delete icon.
Well, your feed is ready. Though CTX feed generates an optimized feed for you, again still there needs some additional optimization to rank highest on Google ads.
Want to know? Let’s then discuss it in brief.
2. Optimizing Product Data Feed for Google Shopping
To ensure your product data feed is optimized, start by ensuring that all product information is accurate and up to date. This includes details like product names, descriptions, prices, and images, etc. Double-check for any errors or inconsistencies in your data.
Additionally, use relevant keywords and attributes to improve searchability and categorization. Insert the most related keywords into product titles and descriptions as well.
When you write optimized titles and descriptions, Google gets a more clear idea of exactly what your product is and boosts your organic ranking accordingly. Consistent optimization also strengthens visibility across marketing efforts, including pr campaigns, making your products more discoverable.
Now, if you’d be a customer, what is the first thing you notice in a product?
Yes, it’s the product image. A high quality image is always a game changer.
It’s because, product images are not only for Google, it’s the first thing your customers notice and make a instant decision to or not to click on your product.
Again, the image optimization isn’t just about the quality, it also needs to be in the proper size. So, when you optimize images for Woocommerce in the best way to balance quality and size, you can easily win people’s attention and the search engine’s as well.
3. Sign up a Free Google Merchant Center account
Now, your optimized product feed is ready, but, how will Google Shopping find your feed and show it to the targeted audience?
Unfortunately, Google Shopping doesn’t have any particular section for product feed submission.
So, how to do it?
Well, it’s through the Google Merchant Center.
You just’ve to submit your product feed to Google Merchant Center, where it undergoes review to ensure your feed meets Google’s policies and standards.
Once approved, Google automatically indexes your product data and makes it available in Google Shopping Ads.
And, don’t worry. Signing up into Google merchant center and submit your feed it totally free and super easy.
So, let’s get into the steps of signing up for Google merchant center. Well, actually it’s now the Google Merchant Center Next.
In case you don’t know, Google Merchant Center Next is the next or you can say updated version of Google Merchant Center.
The main advantage of this version is that you don’t have to upload your product feed manually to Google. It’ll automatically detect your website and pull all the data on the platform. This update is expected to be released within the first half of 2024.
Free sign up in Google Marchent Center:
Now, before sign up for Google merchent, you need a gmail account for it. In case, you don’t, simple create one. If you already have you can directly jump into the steps.
First, go to Google Merchant Center and then click on ‘Sign up for Free’.
Then, add the Required Business Information like business name, address, location, contact details, etc.
Now you need to verify the ownership of your website. Verifying your website ownership might sound tough, but don’t panic!
Google Merchant Center offers 5 different ways to get it done. That means you can choose the method that works best for you. Let’s explore those options in the image below.
You can choose any one you want. However, I prefer “Get a code sent to your business email” or “Use Google Analytics”.
Bonus Tip:
While not mandatory, you can configure settings for shipping, taxes, and product information upload methods at this point.
And you’re done. What can be easier than it, right? Let’s move on to the next step.
4. Upload your feed to Google Marchent Center (GMC)
Now, you just’ve to upload your feed to google marchent center (GMC). Luckily, GMC gives you 5 different ways to upload your products.
But, if you’re confused or even need a hassle-free way, I always recommend you to go with Add products form a file.
It’s because, this method only requires a link of your feed file. Just copy the URL of your feed and paste it here.
You may ask, Where you get the feed url?
Well, you created your feed with CTX Feed, right? Then, just go to CTX Feed on your site, and from the drop down, select Manage Feeds.
On the manage feed section, click on the Copy icon of your generated feed for Google shopping.
After that, again back to the marchent center and simply paste it into the “Enter a link to your file” section.
Google merchant will include the file to it’s database and review it.
Now, what if you continuously update your products?
No issues. You can schedule the time period after which GMC will come to your feeds and check for any updates.
You can set it to 24 hours, weekly or even monthly.
Done! You’ve successfully upload your feed on GMC. And you’re just one step back from complete the process.
5. Link Google Ads with GMC (Final Step)
Now, you’ve upload your feed file in GMC, but how Google shopping will aware of your products?
Yes, you’ve to link the Google Ads with GMC to make Google shopping know about your products. After this, your products will automatically show up in Googls Ads.
Thinking how long it would take?
It’ll be done in just 1 minute. In the GMC, click on the “Ad campaigns” on the right panel.
Then, check the image below and hit the Link button to link to Google Ads.
After that, you’ll be directed to the next page. From there, all you have to do is link your Google Ads account.
You’ll notice that your account is successfully linked with Google Ads.
Done! You’ve completed to list your Woocommerce products on Google Shopping. Now, let’s make the free listing available on the very last step.
6. Free Listing Google Shopping products:
Well, you’re on the final step. Just enable the free listing on Google Ads and you’ll be done.
Simple go to the Google Merchant Center Next and click on Free listing. Once you’re there, make sure the free listing option is enabled here.
Awesome!
Let’s now verify it’s working in Google merchant center. On the left-hand
menu go to products and then feeds. You can see here that it shows free listings for the feed.
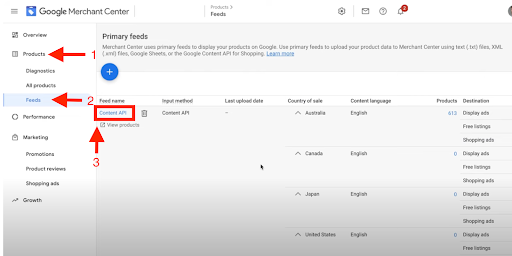
You can then click on the feed name (country API) and here you’ll see that free listings are checked for this country.
Congratulations! Your free listing is done and you’re now live!
7. Paid listing for Google Shopping products (Bonus Step)
While free listing can make a huge impact on your online business, still a
question i often get asked, why would you ever pay for google shopping when you can just keep running free listings instead?
The answer is sales and scale. For my clients, I often see that free listings only make up (1-3)% percent of the total sales that paid shopping brings in.
So, let’s say you’re making 2k per month in sales from your free google shopping listings. Well if you then set up paid google shopping ads you could be making 200 to 600 000 in sales.
Of course, you will have to pay for the clicks but with the right optimization and management, this can be extremely profitable for your business.
Now, let’s check out the steps to do paid listing for Google ShoppingAds:
First, go to Google Ads. On the New Campaign page, enter your site name and hit Next.
Now, you run paid campaign for more sales, right?
Then, on the next page just hit “Get more website sales or leads” and move to next.
Here, you’ll find multiple campaign types for running paid listing Ads.As, you’ve a Woocommerce store, select the shopping type as “Shopping”.
Google Shopping always wants to rank your products in the most specific category, so that your site will show up to a highly targeted audience.
That’s why Google Shopping sets up a subcategory section to narrow down your products’s listing type.
Simple scroll down a little bit and you’ll find the subcategory section. Here, you’ve two options and you can choose any according to your products type.
Bonus Tip:
If you choose Performance max campaign, Google will automatically show your products based on category. But, most Woocommerce user, even I personally go with Standard shopping campaigns and get full control over my ads.
So, to control your ad’s ranking, you’ve to go for bids. You may be thinking, if you bid higher than your competitors, you’ll rank on top.
Actually not just bid in a high amount, you’ve to bid strategically for better ranking in the ad listing.
So, we’re going to select our bid, and as this is a new account for Google shopping, we’re just going to have manual CPC and optimize for conversion
value.
It’s time to add your budget. As you’ve just new in paid listings, I recommend you to set this from $20 to $30 a day for starting.
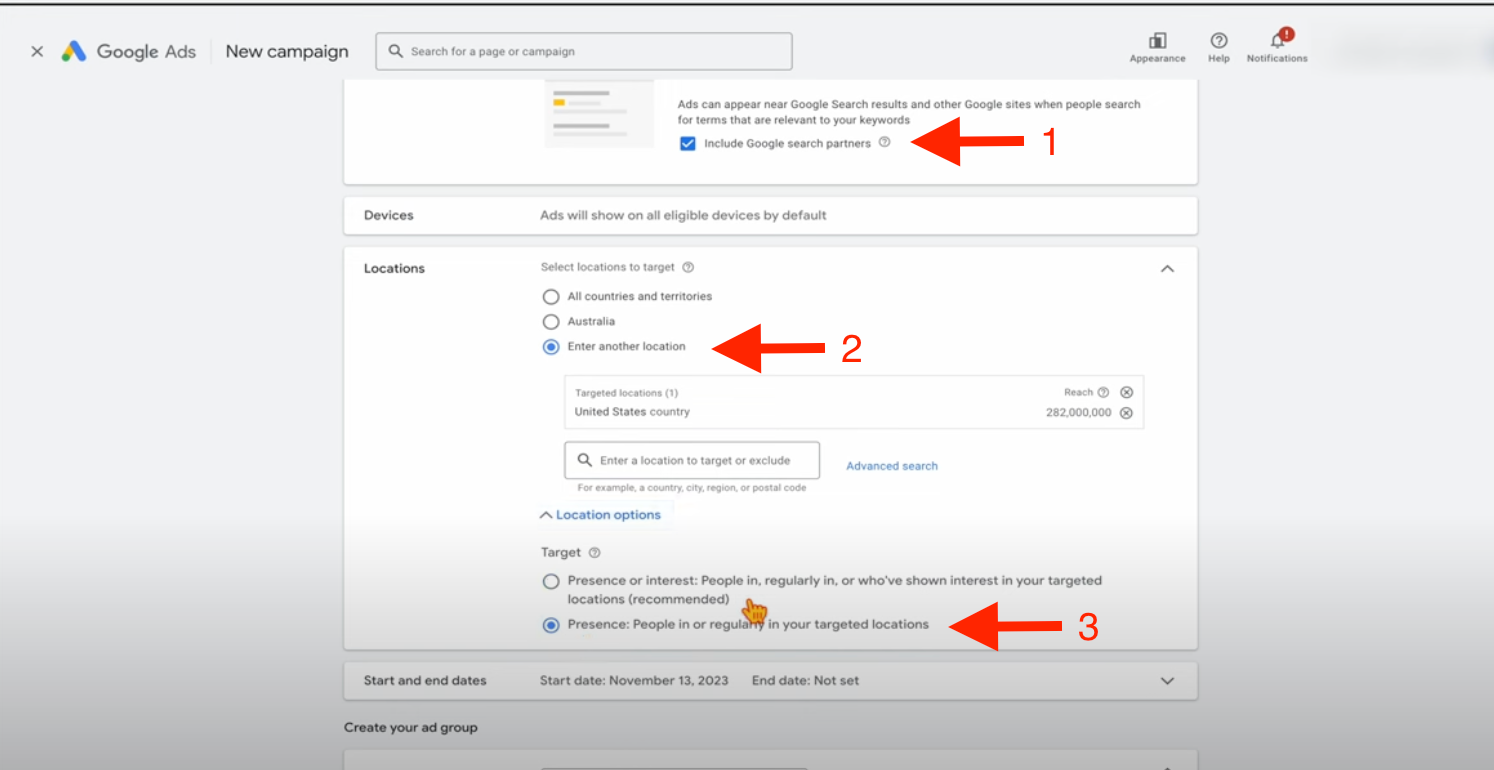
It’s better not to go down into a Targeting setting until you’ve got some greater campaign data.
Now, set the location of people for whom you want to do campaign. Here, I’m going to target the United States.
Bonus Tip:
Here is a thing you need to unterstand. If you’ve a store in USA, then obviously you want to target people who are currently in United States not the outside people just showing interest in your products.
It’s because, paid campaign is all about getting sales, it’s not to make people know about your store. So, when you target outside people far from your location, there is a poor chance to buy from your store with additional shipping cost.
Now, just create your ad group and hit on Create Campaign.
And, you’re successfully live for a paid product listing.
Bonus Tip:
It’s best to set different products in different ad groups. The reason is, you can do two things with it.
One is, you can change your target rows by ad groups. And then, if you see one of your product groups performing really well and you want to add some extra spending to it, you can break it out into a separate budget.
Even I do it for the clients of our company, Webappick.com and it gives me more control over the paid ads and make it easy to customize them separately.
Conclusion:
So, that’s how you can list your products on Google Shopping. A proper listing can really help you get more people looking at your products and buying from your online store. Just follow the steps, and you’ll be able to show off your stuff to lots more potential customers who are searching for things like what you sell. Keep an eye on how well your listings are doing, and don’t be afraid to tweak things to make them even better.